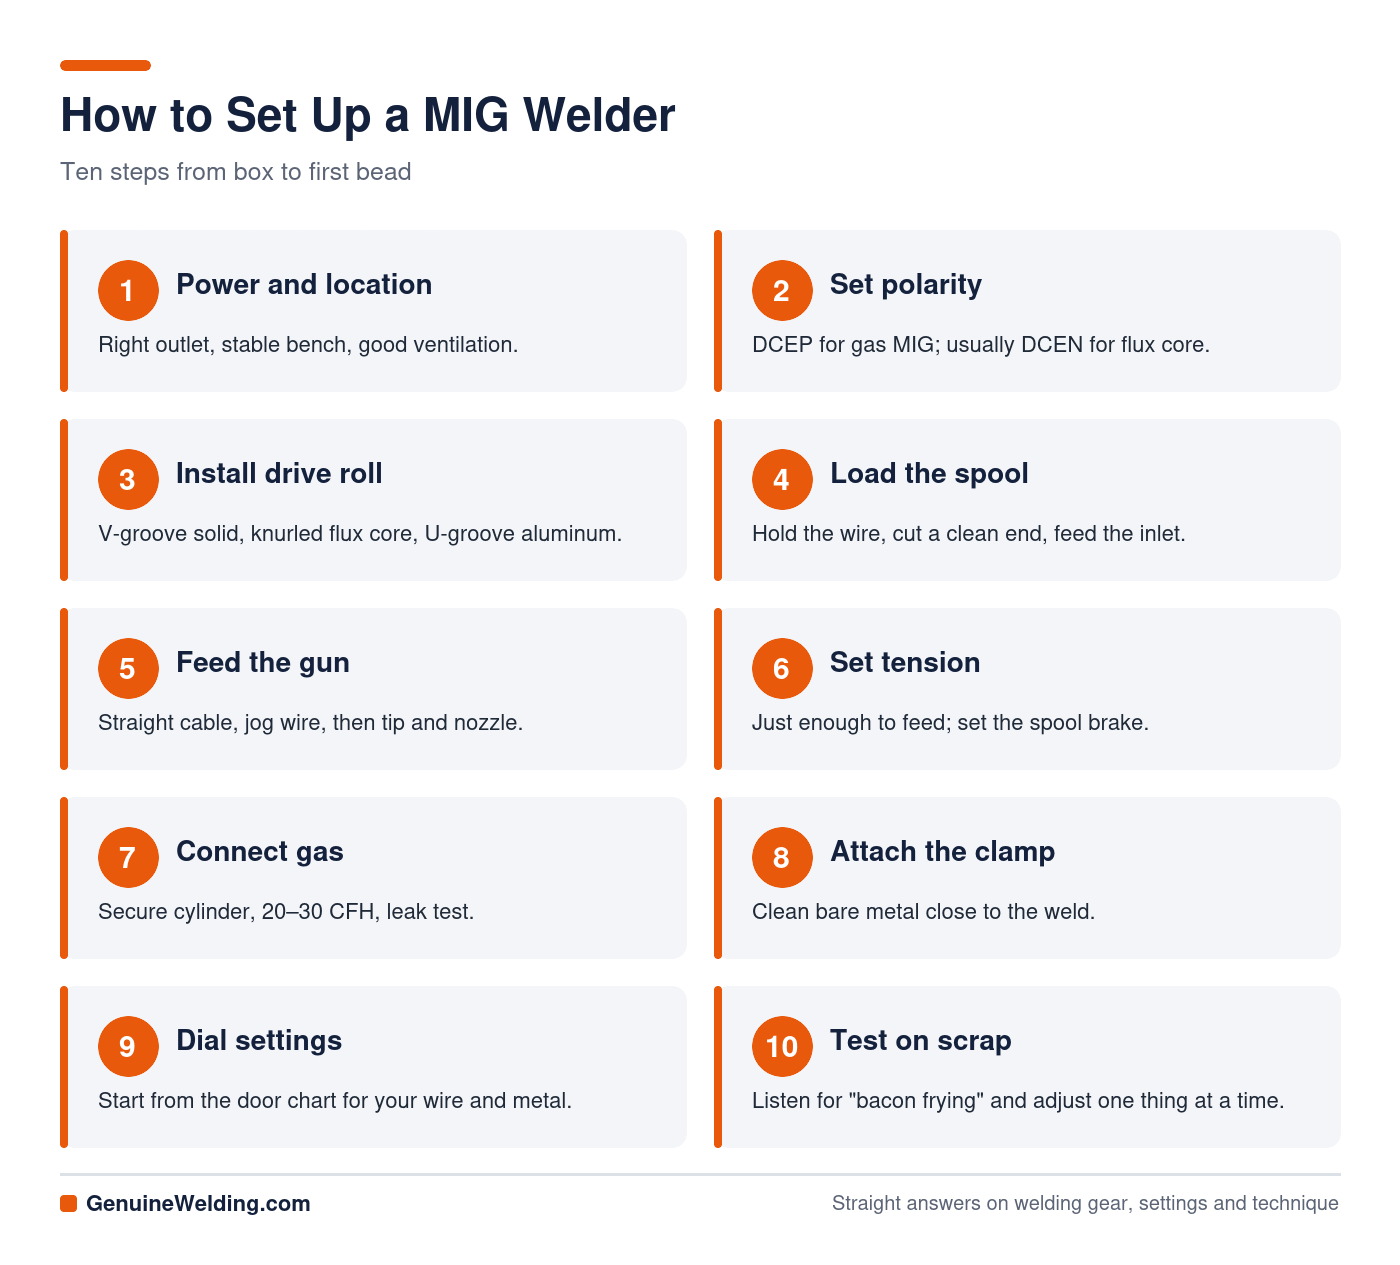
To set up a MIG welder: plug it into the correct outlet, set polarity (DCEP for solid wire with gas, usually DCEN for gasless flux core), install the wire spool, match the drive roll and contact tip to the wire size, feed the wire through the gun, set drive-roll tension and spool brake, connect and set the shielding gas (about 20 to 30 CFH of 75/25 argon/CO2 for steel), attach the work clamp to clean metal, then dial in voltage and wire speed from the chart inside the machine and test on scrap.
Setting up a MIG welder takes about 15 minutes the first time and 2 minutes once you know it. Do it right and the welder feels smooth and forgiving; do it wrong and you’ll fight bird-nests, porosity and spatter. Here’s the full process.
What You Need
- MIG welder and gun, plus the right outlet (120V or 240V); see welder plug types
- Wire: ER70S-6 solid wire for steel with gas, or E71T-GS / E71T-11 flux core for gasless welding
- Matching drive rolls and contact tips
- Shielding gas cylinder and regulator/flowmeter (for solid wire)
- MIG pliers, helmet, gloves, jacket and scrap steel to test on
Step 1: Choose Your Location and Power
Set the welder on a stable surface away from flammables, with good ventilation. Plug it into a circuit that matches the welder’s requirements. Most 120V welders want a dedicated 20A circuit; most 240V welders use a NEMA 6-50 outlet. Avoid long, thin extension cords. See welding at home for garage setup.
Step 2: Set the Polarity
This is the step beginners miss most. Open the machine’s side panel or check the front terminals:
- Solid wire with gas (MIG): DCEP (electrode positive). Gun lead to positive, work clamp to negative.
- Gasless flux core: usually DCEN (electrode negative). Gun lead to negative, work clamp to positive.
Wrong polarity causes heavy spatter, poor penetration and an unstable arc. See welding polarity explained.
Step 3: Install the Drive Roll
Drive rolls have grooves sized for wire diameter. Use a V-groove roll for solid steel wire, a knurled roll for flux-cored wire and a U-groove roll for aluminum. Flip or swap the roll so the groove facing the wire matches your wire size (.023, .030, .035 or .045).
Step 4: Load the Wire Spool
- Mount the spool so the wire comes off the bottom (or as your machine’s diagram shows) and feeds straight into the inlet guide.
- Hold the wire tight before cutting the tie so it doesn’t unravel.
- Cut off the bent end, straighten the first few inches and file or snip a clean tip.
- Push the wire through the inlet guide, over the drive roll and into the gun liner.
Step 5: Feed the Wire Through the Gun
Remove the nozzle and contact tip. Lay the gun cable as straight as possible, then pull the trigger (or use the jog/inch button) until wire comes out the end. Install the contact tip that matches your wire size, then the nozzle. Trim the wire to about 3/8 in of stickout.
Step 6: Set Drive-Roll Tension and Spool Brake
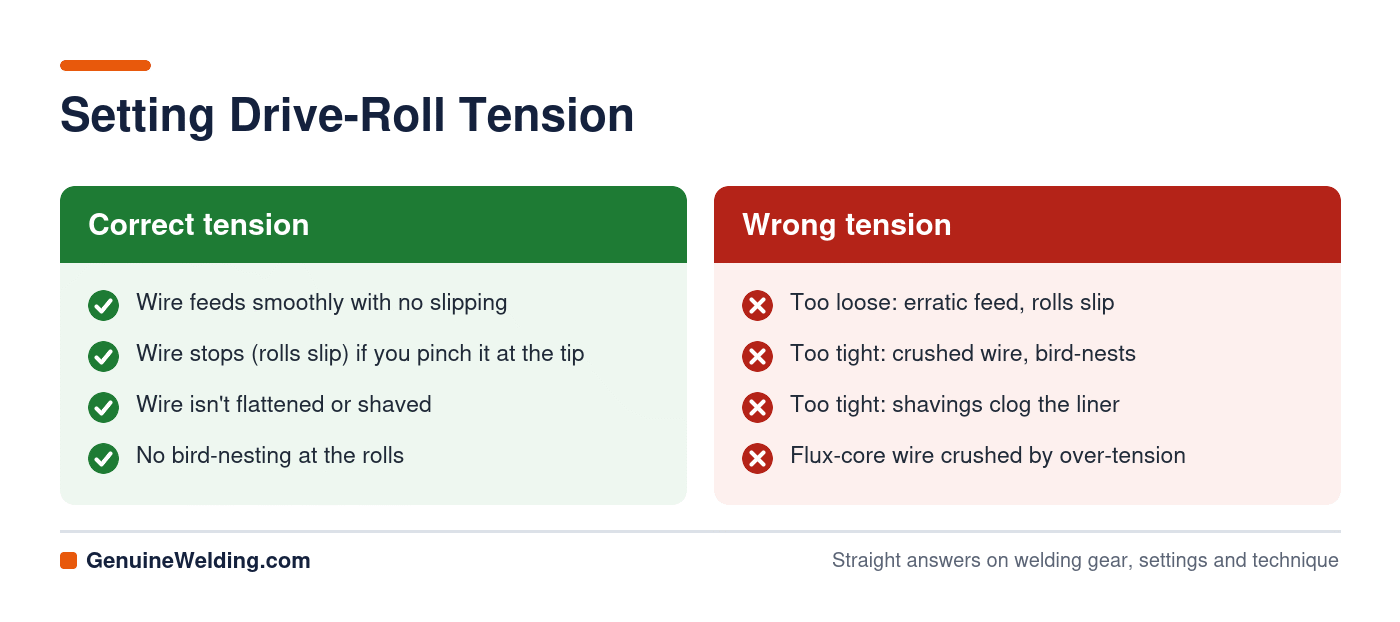
The spool brake (tension nut on the spool hub) should be just tight enough that the spool stops spinning when you release the trigger. Too loose and the wire unravels; too tight and it drags.
Step 7: Connect and Set the Shielding Gas
- Secure the cylinder upright with a chain.
- “Crack” the valve briefly to blow out dust (stand to the side), then install the regulator and tighten with a wrench.
- Connect the gas hose to the welder’s gas inlet.
- Open the cylinder valve slowly. Pull the trigger and set flow to about 20 to 30 CFH.
- Check for leaks with soapy water.
Use 75% argon / 25% CO2 for most steel, 100% CO2 for deeper penetration at lower cost, and 100% argon for aluminum. More in best gas for MIG welding and MIG gas flow settings.
Step 8: Attach the Work Clamp
Clamp to clean, bare metal on the workpiece or a steel welding table, as close to the weld as practical. Paint and rust cause an erratic arc.
Step 9: Set Voltage and Wire Speed
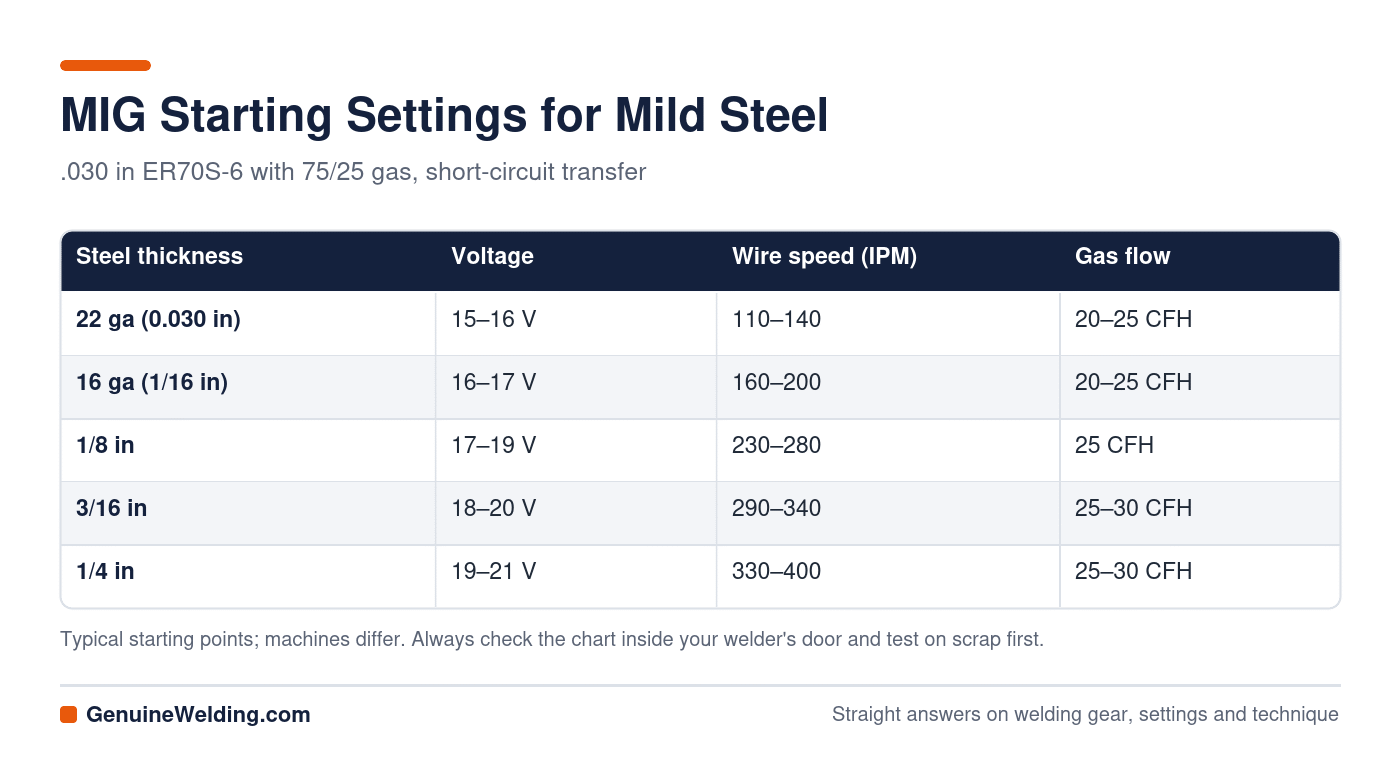
Start with the chart inside your welder’s door for your wire, gas and metal thickness. Then fine-tune by sound: a good short-circuit MIG arc sounds like bacon frying. A loud, popping arc with the wire stubbing into the plate means too much wire speed (or too little voltage); a hissing arc with big droplets means too little wire speed (or too much voltage). See MIG welder settings charts.
Step 10: Test Weld on Scrap
Run a bead on scrap of the same thickness. Look for a flat to slightly convex bead that ties in at the edges with little spatter. Adjust one setting at a time. Then check your technique with push vs pull MIG welding and our MIG welding tips for beginners.
Common MIG Setup Mistakes
| Symptom | Likely setup cause | Fix |
|---|---|---|
| Heavy spatter, weak arc | Wrong polarity | DCEP for gas MIG, DCEN for most flux core |
| Porosity (holes) | No gas, low flow, leak, wind | Open valve, set 20–30 CFH, check leaks, block drafts |
| Bird-nesting at the drive roll | Too much tension, wrong roll, kinked liner | Reduce tension, match roll, straighten cable |
| Wire burns back to tip | Wire speed too low, stickout too short | Raise wire speed, use 3/8–1/2 in stickout |
| Erratic arc | Wrong tip size, poor ground | Match tip to wire, clean the clamp spot |
How to Set Up a MIG Welder: FAQs
What polarity should a MIG welder be?
DCEP (electrode positive) for solid wire with shielding gas. Most self-shielded flux-core wires use DCEN.
What gas flow should I use for MIG welding?
About 20 to 30 CFH indoors. Increase slightly for drafty areas, but don’t exceed what’s needed, because excessive flow causes turbulence and porosity.
Which way does MIG wire go on the spool?
Follow the diagram in your welder; the wire should feed off the spool in a straight line to the drive rolls without twisting.
Do I need gas for a MIG welder?
Only for solid wire. Gasless flux-core wire makes its own shielding, so you can weld without a cylinder.
What wire size should a beginner use?
.030 in is ideal for most 120V welders and thin to medium steel; .035 in is a good all-around size on larger machines.