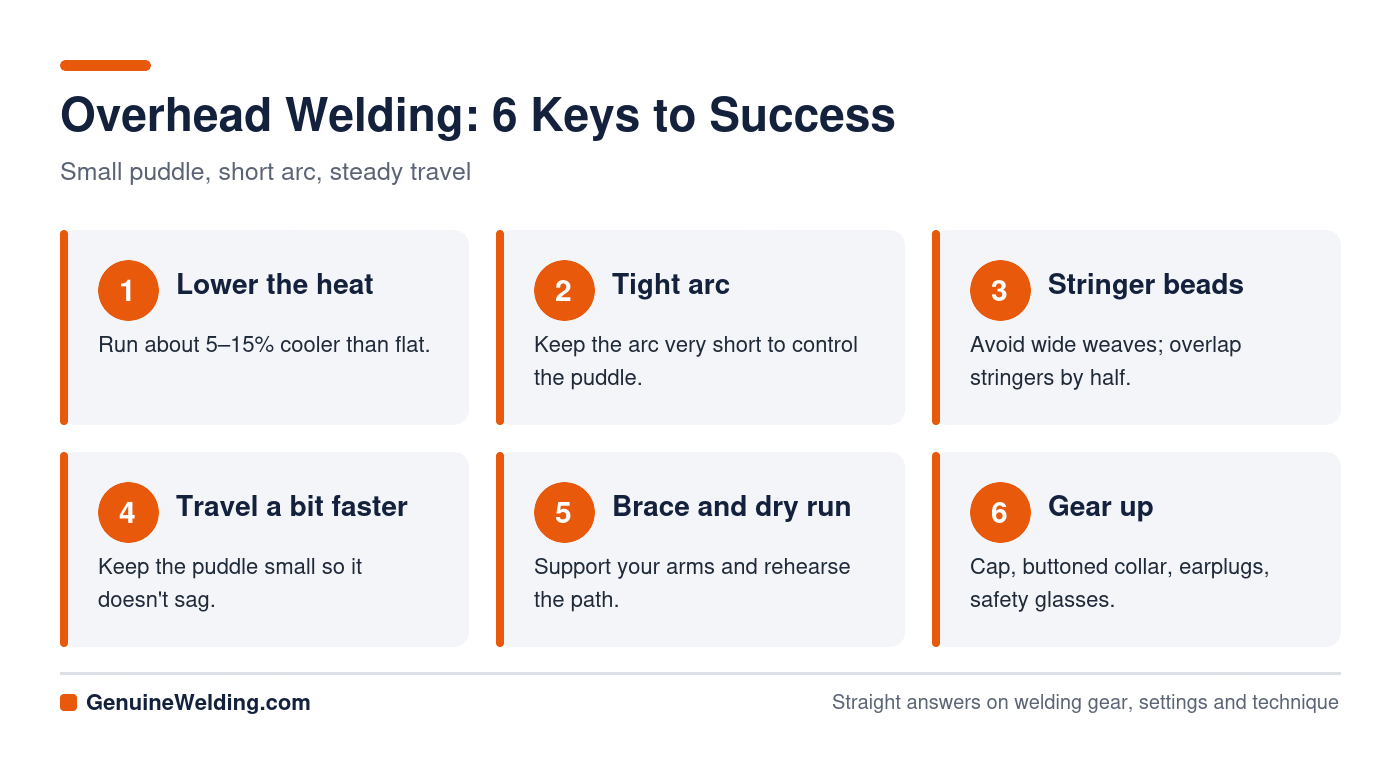
Overhead welding means welding on the underside of a joint with the arc pointed up. The 4G position is an overhead groove weld on plate, and 4F is an overhead fillet weld. To weld overhead successfully, run slightly lower heat than flat, keep a very short arc, use small stringer beads instead of wide weaves, travel a bit faster and let surface tension hold a small puddle in place. Protect yourself from falling sparks with a leather cap, buttoned collar, earplugs and safety glasses.
Overhead is the position most welders dread, but it’s also the one that makes you a complete welder. Structural certifications, pipe work and field repairs all require it. This guide covers setup, technique for stick, MIG and TIG, and how to pass a 4G test.
What Are the 4G and 4F Positions?
- 4G: a groove weld on plate in the overhead position. The plates are horizontal and you weld from underneath.
- 4F: a fillet weld in the overhead position, usually a T-joint or lap joint welded from below.
- Pipe: the bottom section of 5G and 6G pipe joints is also welded overhead.
See how all positions compare in welding positions explained. Under AWS D1.1, passing both the 3G (vertical) and 4G (overhead) plate tests qualifies you for groove and fillet welds on plate in all positions.
Safety First: Gear for Overhead Welding
Gravity sends sparks, spatter and molten slag straight down at you. Before you strike an arc overhead:
- Wear a leather or FR welding cap under your helmet and a jacket with the collar buttoned.
- Use earplugs. Hot spatter in the ear canal is a real and painful injury.
- Wear safety glasses under the hood, plus leather sleeves or a full jacket and gauntlet gloves.
- Avoid synthetic clothing, which melts. Tuck pant legs over boots so slag can’t fall inside.
- Position your body to the side of the arc, not directly underneath it, so fumes and spatter don’t fall on your face.
- Ventilate well and keep combustibles away; have a fire extinguisher close.
More in our welding safety guide and best welding jackets.
Body Position and Setup
- Get comfortable. Set the work at a height where you can see the joint without straining your neck.
- Take the weight off. Drape the lead or MIG cable over your shoulder so you’re not fighting its weight.
- Brace yourself. Rest your free hand, arm or shoulder against something solid.
- Do a dry run. Move through the whole weld before striking an arc to make sure you can reach the end.
- Clean the joint well; contamination shows up faster overhead.
Overhead Welding Technique by Process
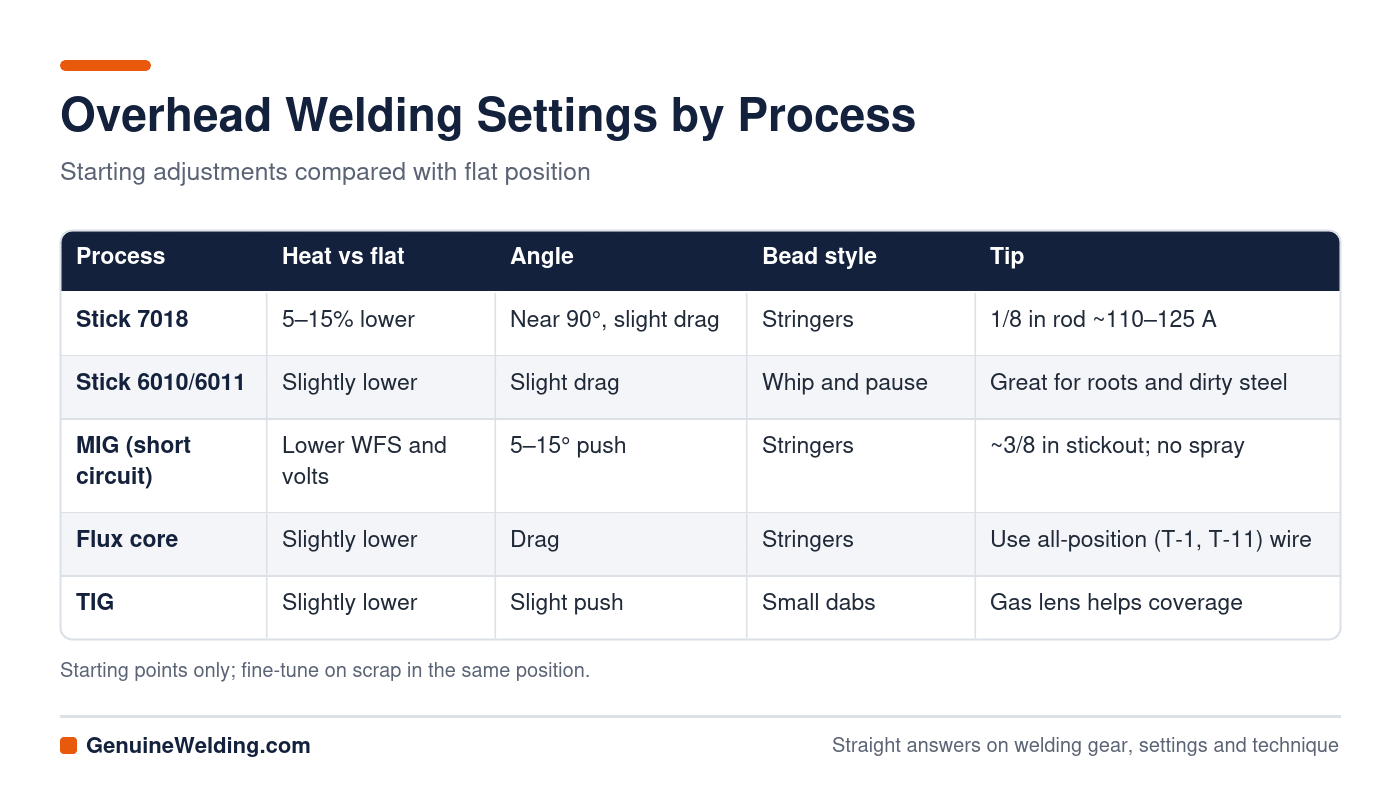
Stick (SMAW)
Use 1/8 in or 3/32 in 7018 for most overhead fill and cap work, and 6010 or 6011 for roots and dirty steel. Run about 5 to 15% cooler than flat (for 1/8 in 7018, often around 110 to 125 amps). Hold a very short arc, almost pushing the rod into the puddle, with the rod nearly perpendicular and a slight drag angle. Run straight stringers or very small weaves. With 6010, a quick whip lets the puddle freeze between movements. See 7018 settings.
MIG (GMAW)
Use short-circuit transfer with .030 or .035 wire. Drop wire speed and voltage slightly from your flat settings, use a slight push angle of 5 to 15 degrees and keep stickout around 3/8 in. Stringer beads work best. Don’t use standard spray transfer overhead; the puddle is too fluid. Pulsed MIG can work overhead on suitable machines. See MIG settings charts.
Flux core (FCAW)
Choose an all-position wire (look for a “1” in the classification, such as E71T-1 or E71T-11). Use a drag angle, keep the puddle small and clean slag thoroughly between passes.
TIG (GTAW)
Reduce amperage a little, keep the puddle small and add filler more frequently in small dabs. A gas lens helps keep coverage as you twist into awkward angles. Brace both hands; a TIG rig can help.
How to Weld a 4G Overhead Groove
- Fit-up: a typical 4G structural test uses beveled plate with a backing strip. A common setup is a 45° included groove angle (22.5° per side) and about a 1/4 in root opening; follow your test WPS.
- Root pass: fuse both bevel edges into the backing bar. Keep the arc tight and travel steadily so the puddle doesn’t sag.
- Fill passes: lay stringers side by side, overlapping each by about half. Clean every pass. Tie into both sidewalls to avoid lack of fusion.
- Cap: run stringers across the joint, keeping reinforcement low (about 1/16 to 1/8 in) and avoiding undercut at the edges.
Plates are usually bend-tested after visual inspection. See welding certifications and bend testing.
How to Weld a 4F Overhead Fillet
- Point the electrode roughly 45° into the corner, biased slightly toward the overhead (horizontal) plate, because gravity pulls metal down off it.
- Use a slight drag (stick, flux core) or push (MIG) angle.
- Keep each bead small. For larger fillets, make a root pass, then build up with overlapping stringers.
- Watch for undercut on the overhead plate and overlap on the vertical plate.
Common Overhead Welding Problems
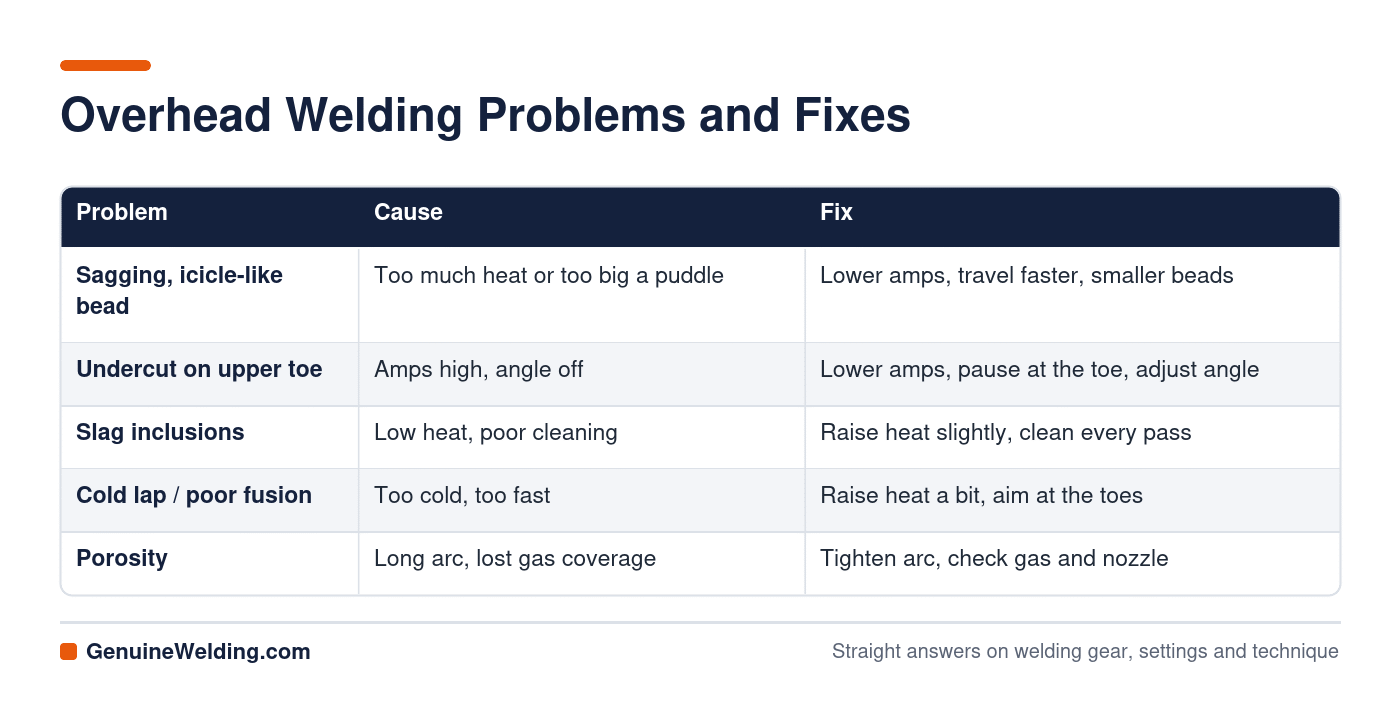
More fixes: undercut, overlap and slag inclusions.
Overhead Welding FAQs
Is overhead welding harder than vertical?
Most welders find overhead harder at first because of body position, falling spatter and puddle control. With practice, many find it easier than vertical up.
What is the best rod for overhead welding?
E7018 in 1/8 in or 3/32 in for most structural work, and E6010 or E6011 for roots or dirty metal. Any rod with a “1” as the third digit is rated for overhead.
Should I turn the amps down for overhead?
Usually yes, about 5 to 15% lower than flat, so the puddle stays small. Too low, though, causes cold lap and slag inclusions.
Should I weave when welding overhead?
Keep weaves very small or use stringer beads. Wide weaves let the puddle grow and sag.
How do I stop spatter from burning me overhead?
Wear a welding cap, button your collar, use earplugs and stand to the side of the arc. Leather gear is best.
Sources
- American Welding Society: AWS D1.1 Structural Welding Code – Steel
- OSHA: Welding, Cutting and Brazing