Welding leads are the two heavy copper cables that carry current between your welder and the work: the electrode lead ends in the stinger (electrode holder), and the work lead (often called the ground lead) ends in the work clamp. Together they complete the welding circuit. Size the cable for your amperage and total lead length, keep connections tight and clean, and put the electrode lead on the correct terminal for your rod’s polarity.
Bad leads cause more “bad machine” complaints than bad machines do. A loose lug, an undersized cable or a rusty ground clamp makes the arc hard to start, wanders the bead and overheats your gear. This guide explains each part and how to set it up right.

What Are Welding Leads?
A welding circuit is a loop. Current leaves one output terminal on the welder, travels down the electrode lead to the stinger and rod, jumps the arc into the workpiece, flows through the metal to the work clamp, and returns along the work lead to the other terminal. If any part of that loop has high resistance, the arc suffers.
- Electrode lead: the cable from the welder to the stinger (or to the TIG torch or MIG gun).
- Work lead: the cable from the welder to the work clamp. Most welders call it the ground lead, but it is technically the return path for welding current, not an electrical safety ground.
- Stinger (electrode holder): the insulated clamp that grips the stick electrode.
- Work clamp (ground clamp): the clamp that connects the work lead to the part or welding table.
- Connectors and lugs: the hardware that joins cable to machine, holder and clamp.
The Stinger (Electrode Holder)
A stinger is rated by the amperage it can carry continuously. Choose one rated at or above your machine’s maximum output.
- Jaw (clamp) style: spring-loaded jaws with grooves that hold the rod at several angles. The most common type on shop welders.
- Twist-lock (T-type) style: you twist the handle to lock the rod. Fully insulated and less likely to arc against steel, popular with pipeliners and in tight spaces.
- Amp ratings: 200 A holders suit small stick welders; 300 A holders cover most 1/8 in and 5/32 in work; 400 to 500 A holders are for heavy industrial use.
Replace a stinger with cracked insulation, burned jaws or a loose cable connection. A worn holder runs hot and can shock you through a sweaty glove.
The Work Clamp (Ground Clamp)
- Spring clamp: fast and common, fine for light and medium work if the jaws stay clean.
- Screw or C-clamp: the most reliable connection for high amperage and long welds.
- Magnetic clamp: handy on flat steel surfaces, but make sure it seats on clean metal.
- Rotary clamp: lets you turn pipe or shafts while welding without twisting the lead.
A brass or copper-contact clamp conducts better than plain steel. Learn more in our guide to essential welding tools.
Welding Cable: Size, Length and Construction
Welding cable uses hundreds of fine copper strands so it stays flexible, inside a tough rubber (EPDM or neoprene) jacket. Larger cable (smaller gauge number, or 1/0 to 4/0) carries more current with less voltage drop. What matters is the total circuit length: add the electrode lead and work lead together.
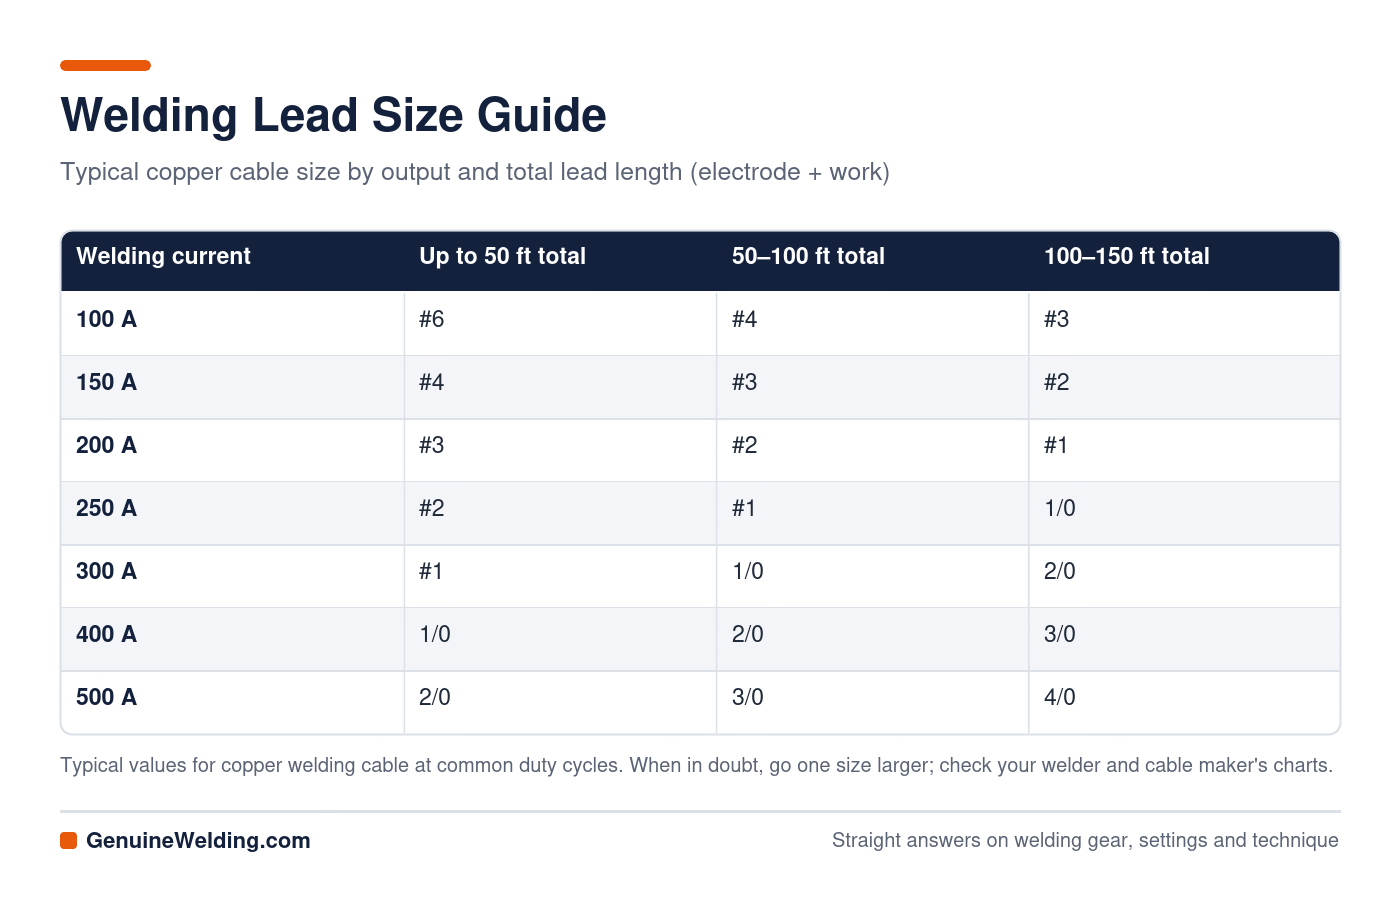
Undersized leads get hot, waste power and make the arc feel weak, especially on long runs. For the full chart by amps and distance, see our welding cable size chart.
Lead Connectors and Lugs
- Dinse-style (twist-lock) connectors: standard on most inverter welders. Size 35-50 covers about 3/8 in plugs for #6 to 1/0 cable; 50-70 is a larger plug for 1/0 to 2/0 cable. Match the plug to your machine’s socket.
- Tweco-style connectors: common on engine drives and shop machines for joining or extending leads.
- Ring lugs: bolt directly to studs on older or industrial machines. Crimp with the right tool, then seal with heat-shrink.
- Cable splices: use insulated, purpose-made connectors, never tape over bare wire.
How to Set Up Welding Leads Correctly
- Check polarity. Plug the electrode lead into the terminal your process needs (see the chart below).
- Tighten every connection. Twist Dinse plugs fully home and check bolts on lugs. Loose connections cause heat and arc instability.
- Clean the clamp spot. Clamp to bare, clean metal, not paint, rust or mill scale.
- Clamp close to the weld. Keep the work clamp near the joint so current does not travel through bearings, hinges, chains or machinery, which can be damaged by arcing.
- Uncoil long leads and lay them flat so they do not overheat or create kinks.
- Route leads safely. Keep them out of walkways, water and away from sharp edges and hot slag.
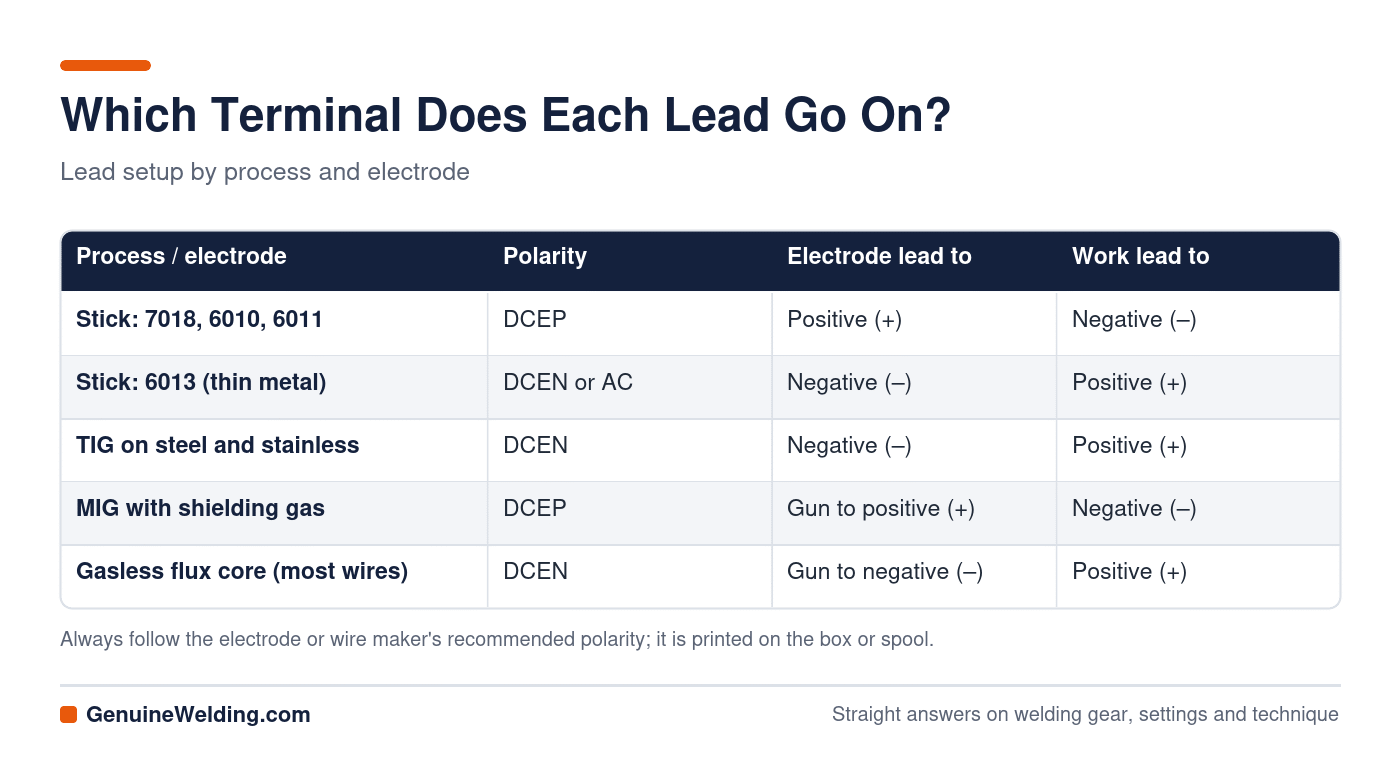
Not sure which polarity a rod wants? Our guide to welding polarity: DCEN vs DCEP vs AC explains it.
Inspecting and Maintaining Welding Leads
- Look for cuts, cracks, burns and bare copper on the jacket. Replace damaged sections.
- OSHA does not allow electrode cables with splices within 10 feet of the holder, and joints must use connectors made for the purpose.
- Feel connections after a long weld. A hot lug or plug means high resistance; clean and retighten it.
- Clean clamp jaws with a wire brush and replace weak springs.
- Store leads coiled loosely on a hanger, off the floor and away from oil and solvents.
Our welding safety guide covers electrical shock prevention in more detail.
Welding Leads FAQs
Is the ground clamp really a ground?
Not in the electrical safety sense. It is the work clamp that returns welding current to the machine. The welder’s power cord provides the safety ground.
Can I make my welding leads longer?
Yes, with proper cable connectors and a larger cable if the total length grows. Longer leads mean more voltage drop, so upsize the gauge.
Does it matter which lead is longer?
Only the total matters for voltage drop. In practice, keep the work lead long enough to clamp near the weld and the electrode lead long enough to reach comfortably.
Why does my stinger get hot?
Common causes are a holder rated below your amperage, a loose cable connection inside the handle, or worn jaws. Fix the connection or upgrade the holder.
Can I use battery cable as welding cable?
It is not recommended. Battery cable is stiffer, with fewer strands, and its insulation is not designed for constant dragging around a shop.