A good weld has a consistent width and ripple pattern, blends smoothly into both pieces of metal at the toes, and shows no cracks, pinholes, undercut or unfilled craters. A bad weld looks uneven, sits on top of the metal like a rope, has holes or cracks, or melts grooves into the base metal beside the bead. You can catch most of these problems with nothing more than good light, a wire brush and a few simple gauges.
Visual inspection is the first and cheapest test every weld gets. Inspectors working to AWS D1.1 look at every weld before any X-ray or bend test, and most rejects are caught right there. This guide shows you what to look for, what causes each defect and how to fix it.
What Does a Good Weld Look Like?
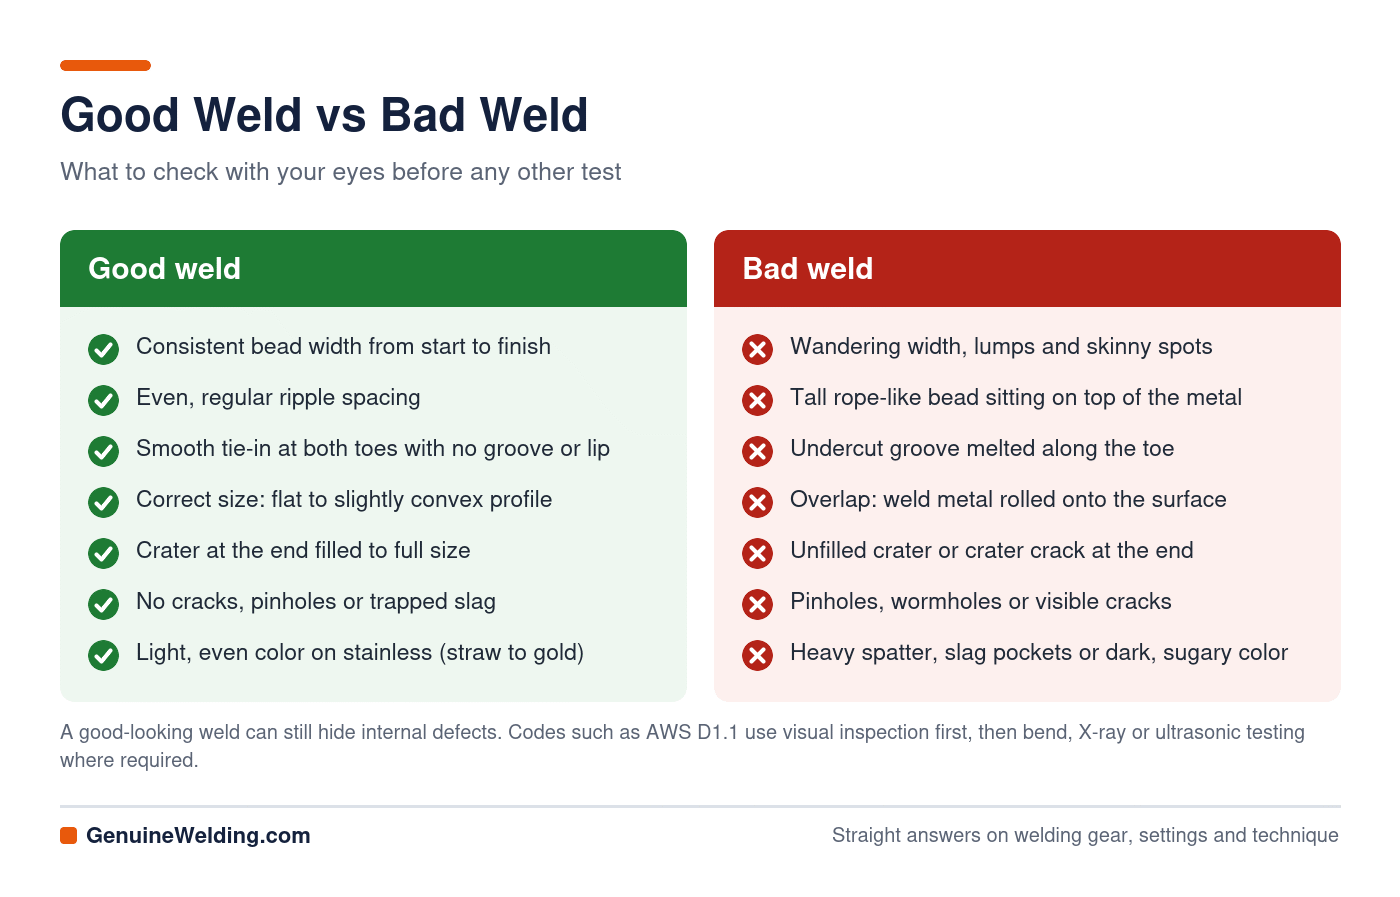
A good weld looks the same from start to finish. That consistency tells you the welder held a steady arc length, travel speed and angle. Check for these signs:
- Even width: the bead stays the same width along its length, without fat spots or skinny sections.
- Uniform ripples: the ripple marks are evenly spaced and shaped. Stick and TIG beads usually show tight, regular ripples; a good MIG bead is smooth with fine ripples.
- Smooth toes: the edges of the bead (the toes) flow into the base metal with no groove (undercut) and no lip rolled over the surface (overlap).
- Correct size and profile: fillet welds are flat to slightly convex and meet the specified leg size. Groove welds have a small, even reinforcement, usually no more than about 1/8 in high.
- Full craters: the end of the weld is filled, not left as a dished crater that can crack.
- Clean surface: no pinholes, cracks, slag pockets or heavy spatter.
- Proper color: on stainless and titanium, light straw to gold color means good gas coverage; gray or black means the metal was overheated or poorly shielded.
Appearance is not proof of strength. A pretty bead can still lack fusion at the root. That is why codes use visual inspection as a gate, not a guarantee. For a deeper look at how welds are tested beyond the surface, see our guide to weld quality testing.
Signs of a Bad Weld
Bad welds usually announce themselves. These are the defects you can see with your eyes:
1. Porosity (pinholes)
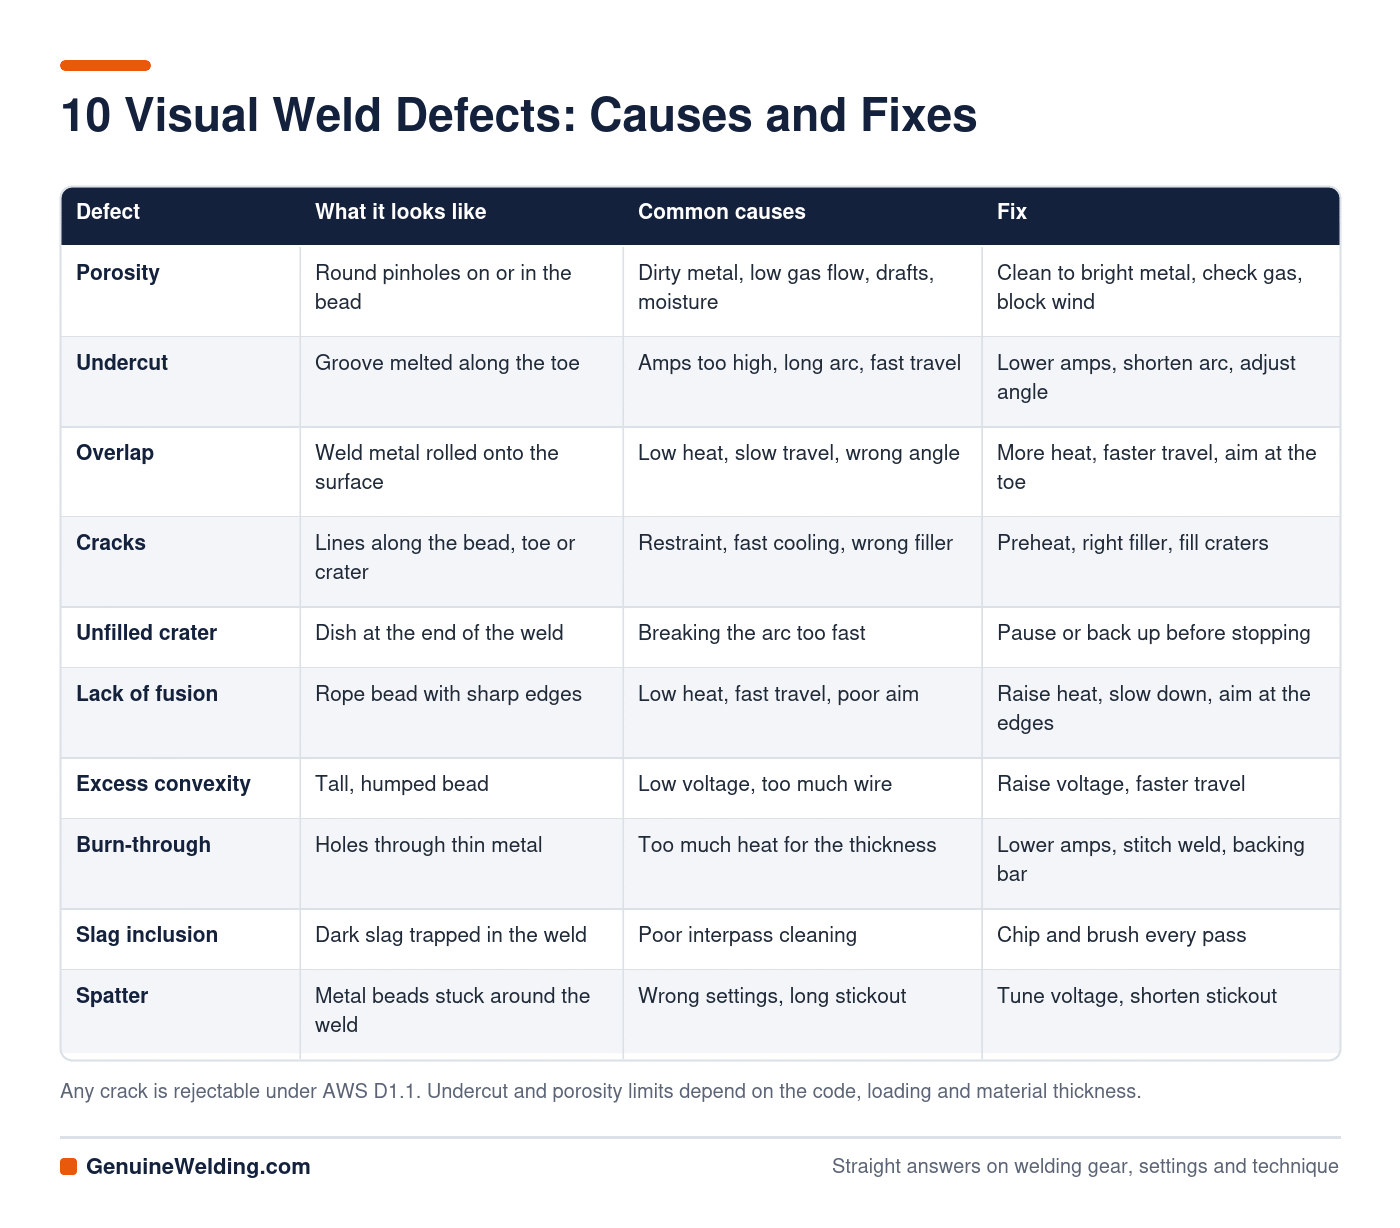
Small round holes on the surface or trapped inside the bead. Porosity comes from gas: dirty metal, oil, paint, moisture, too little shielding gas, wind blowing the gas away or a clogged nozzle. Clean to bright metal, check gas flow and block drafts. Read more in welding porosity: causes and prevention.
2. Undercut
A groove melted into the base metal along the toe that the filler did not fill. It reduces the thickness of the part and creates a stress riser. Causes include too much amperage, too long an arc, too fast travel and a poor gun or rod angle. See undercut in welding.
3. Overlap (cold lap)
Weld metal rolls over the edge of the bead and sits on the surface without fusing. It looks like a lip or a shelf. It usually means the heat is too low or travel is too slow. Our guide to overlap in welding covers the fixes.
4. Cracks
Any crack is a reject under every major code. Look for lines along the center of the bead, at the toes and in the crater at the end. Causes range from high restraint and fast cooling to the wrong filler or high-sulfur steel. See welding cracks.
5. Crater cracks and unfilled craters
When you stop the arc too quickly, the puddle shrinks and leaves a dish. That dish often cracks as it cools. Pause briefly or back up into the bead before breaking the arc to fill it.
6. Lack of fusion and incomplete penetration
The bead sits on top of the metal instead of melting into it. Signs include a very tall, narrow, rope-like bead and sharp edges where the weld meets the plate. On a groove weld, you may see an unmelted root edge on the back side. Turn up the heat, slow down slightly and aim the arc at the leading edge of the puddle.
7. Excessive convexity or reinforcement
A bead that is too tall and humped wastes filler and creates a sharp notch at the toe. It usually comes from low voltage on MIG, too much wire or too slow travel.
8. Burn-through
Holes melted all the way through thin metal. Reduce amperage, move faster and use stitch welds. More in welding burn-through.
9. Slag inclusions
Dark slag trapped on or in the weld, often between passes. Chip and brush every pass clean before the next one. See slag inclusion in welds.
10. Excessive spatter
Spatter is mostly a cosmetic problem, but heavy spatter points to wrong settings, long stickout or dirty metal. Our guide on reducing weld spatter explains the fixes.
How to Visually Inspect a Weld: Step by Step
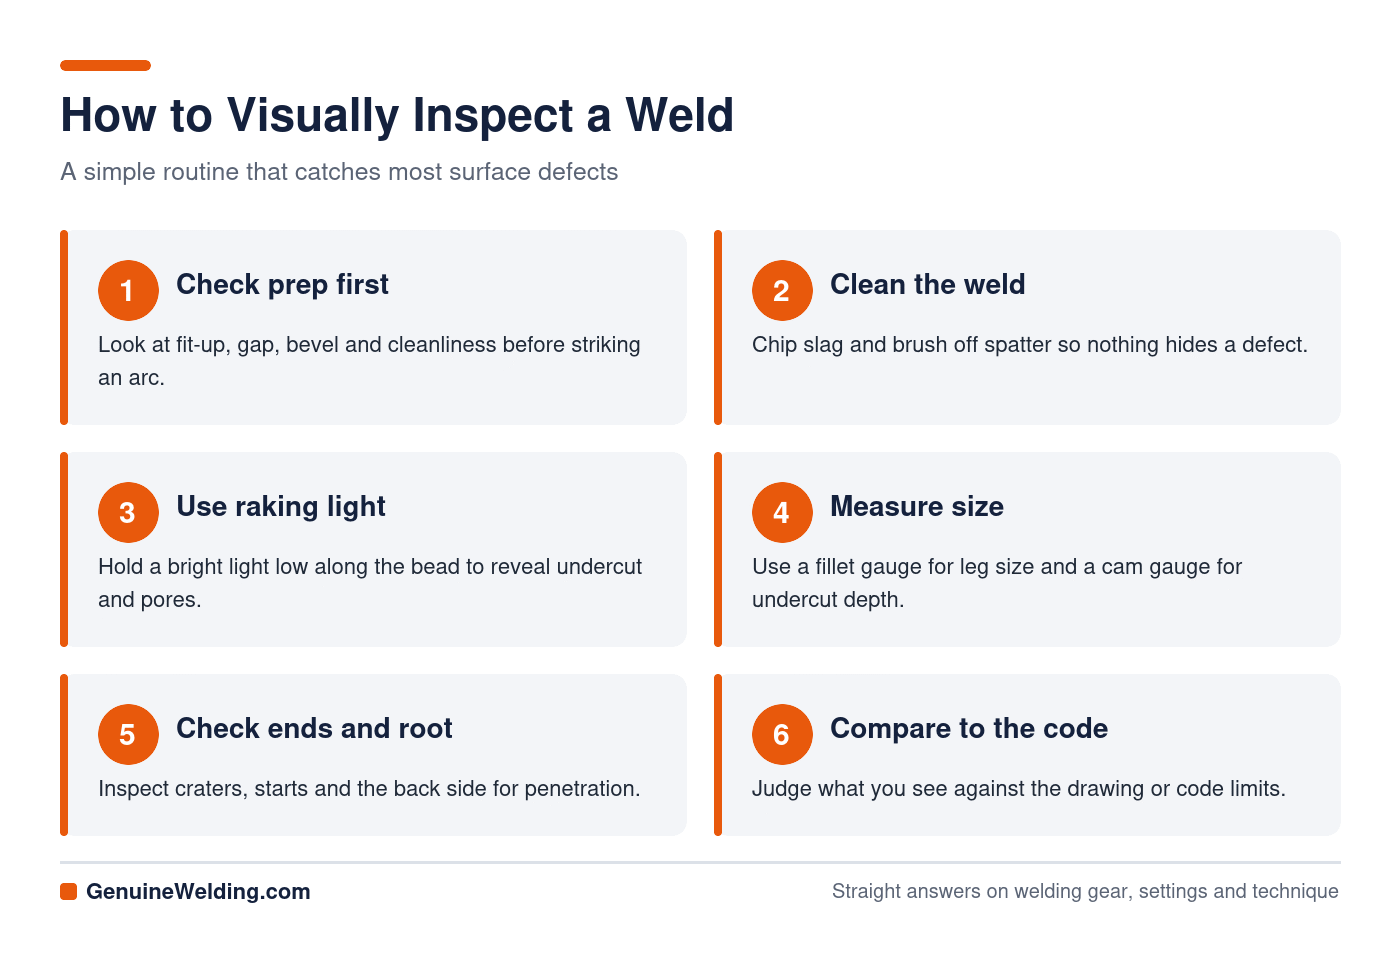
- Inspect before you weld. Check fit-up, gap, bevel angle and cleanliness. Many defects start with bad prep.
- Watch during welding. Look at the puddle, the sound of the arc and interpass cleaning. Fixing a pass is easier than grinding out a finished weld.
- Clean the finished weld. Remove slag and spatter with a chipping hammer and wire brush so nothing hides a defect.
- Use good light. Shine a bright flashlight low along the bead. Raking light makes undercut, overlap and porosity stand out.
- Measure the size. Use a fillet gauge to check leg size and convexity, and a Bridge Cam or similar gauge for undercut depth and reinforcement height.
- Check both ends and the back side. Look for crater cracks, cold starts and incomplete root penetration.
- Compare to the standard. If you work to a code or a drawing, compare what you see to its acceptance criteria and mark rejects.
Visual Acceptance Criteria in Welding Codes
For structural steel, AWS D1.1 sets visual acceptance limits. In general terms, it rejects any crack, requires full fusion between weld and base metal, requires craters to be filled to the full weld size, and limits undercut (typically to 1/32 in deep for most statically loaded parts, with some allowance for short lengths) and visible porosity. Fillet welds must meet the specified size, with limits on underfill.
Other codes, such as ASME Section IX, API 1104 for pipelines and AWS D17.1 for aerospace, have their own criteria. Always check the exact edition your job calls for. Our guide to welding codes and standards explains which code covers what.
Good vs Bad Welds by Process
| Process | Good weld looks like | Common bad-weld signs |
|---|---|---|
| MIG (GMAW) | Smooth, slightly convex bead with fine ripples and little spatter | Tall rope bead (cold), heavy spatter, porosity from lost gas |
| Stick (SMAW) | Even ripples, slag peels off easily, flat to slightly convex face | Slag pockets, undercut, arc strikes, uneven width |
| TIG (GTAW) | Evenly spaced “stacked dimes,” bright color, clean toes | Gray or sugary color, tungsten inclusions, uneven dabs |
| Flux core (FCAW) | Uniform bead under easy-to-remove slag | Wormhole porosity, trapped slag, excessive spatter |
Not sure which process you are using or how settings affect the bead? Our MIG settings chart and weld troubleshooting guide are good next stops.
Tools for Visual Weld Inspection
- Bright flashlight or inspection light
- Fillet weld gauges for leg size and throat
- Bridge Cam (multi-purpose) gauge for undercut, reinforcement and angle
- Magnifying glass (5x to 10x) for fine cracks
- Inspection mirror for the back side of pipe and hidden joints
- Wire brush and chipping hammer to clean the weld
If you need to find surface cracks you cannot see, dye penetrant or magnetic particle testing are the next steps.
Good Weld vs Bad Weld: FAQs
Can a weld look good but still be bad?
Yes. A weld can look clean on the surface but have lack of fusion, porosity or slag inside. That is why critical welds also get bend tests, X-ray or ultrasonic testing.
What is the most common welding defect?
Porosity is one of the most common, especially with MIG and flux core outdoors. Undercut and lack of fusion are close behind for beginners.
Should I grind a bad weld out?
For cracks, lack of fusion and heavy porosity, yes: grind it out to sound metal and reweld. Small undercut can often be repaired by adding a small stringer bead along the toe.
How do I know if my weld has enough penetration?
On a groove weld, look at the back side for a small, even root bead. On practice coupons, cut, grind and etch a cross section, or bend-test the piece to see whether it holds.
Does a bigger weld mean a stronger weld?
Not always. Excess reinforcement adds stress at the toes and wastes filler. A weld that meets the specified size with full fusion is stronger than a large weld sitting on top of the metal.